Norton is one of the most trusted names in the antivirus market. Norton products come in a wide range of retail arrangements, thereby providing Mac users with optimal choices that serve best their unique needs. The antivirus is extremely effective in removing known malware that can cause substantial damage to the system and even lead to the loss of personal data. A user can ensure virus protection by selecting one out of four scanning regimes: automatic, scheduled scanning, idle scanning, and virus definitions mode.

how to delete norton

Not unlike other antiviruses, Norton Security has several downsides that make its use less attractive for some members of the Apple family.

norton on macPerhaps the biggest drawback of the utility is its drainage of system resources. The issue is especially prominent for MacBook Air users because the laptop is less powerful than other Mac models. In addition to using a hefty amount of CPU and RAM, Norton antivirus is quite costly.

For these reasons, many Mac users turn to alternative virus protection solutions. After finding an antivirus with similar detection rates and at a lower price, Apple aficionados wonder how to uninstall Norton from their Mac. Here’s where this article comes in. Keep on reading to find out how to remove the antivirus once and for all.

How to Uninstall Norton Antivirus on Mac?

The process of removing Norton Internet Security from a Mac is fairly straightforward. However, there are some important caveats, which will be discussed later in the article. According to the information presented on the Norton website, the uninstallation process hinges on the type of Norton product purchased by a user. Thus, owners of Norton Security should do the following:

  1. Click on the Finder icon in the Dock;
  2. Click on the Go menu and proceed to the Applications folder;
  3. Search the contents of the folder to locate Norton Security;
  4. Launch the antivirus by double-clicking on it;
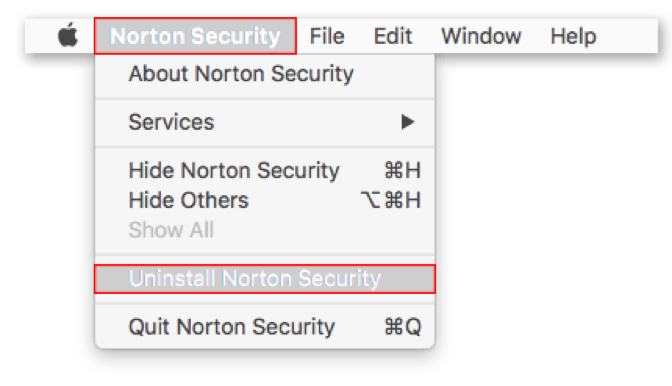
  5. In the utility’s menu bar, click on the Norton Security tab;
  6. In the drop-down menu, select the Uninstall Norton Security option;

pick uninstall norton

  1. In the confirmation window that opens, click on the Uninstall button;
  2. Enter your administrator’s password and username;
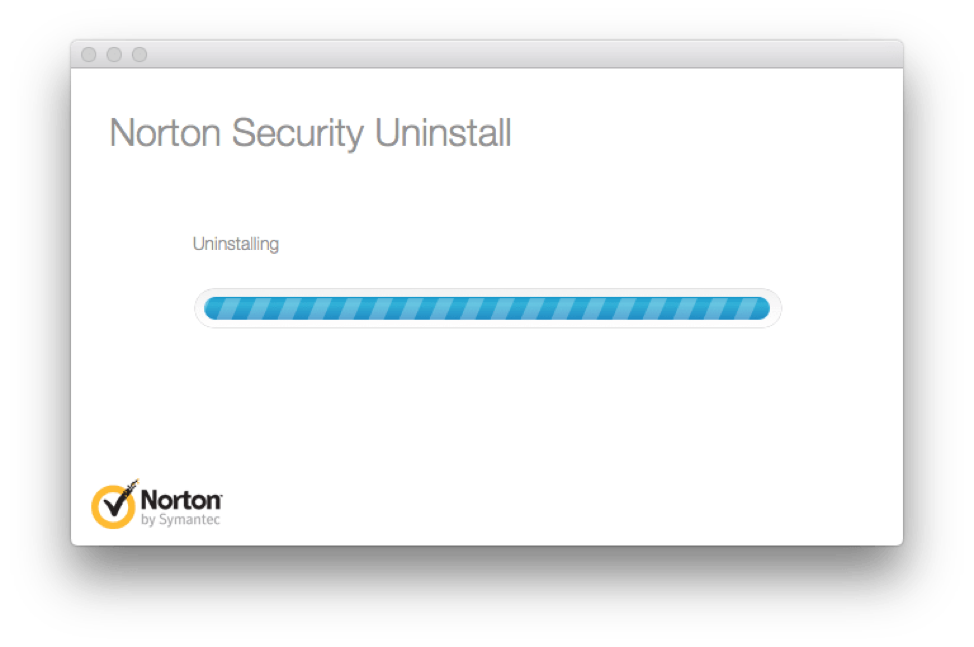
  3. Wait until all files are cleared;
  4. Restart the Mac.

uninstalling nortor security

Those who want to uninstall Norton AntiVirus or Norton Internet Security should go through the following steps:

If for some reason you don’t have Symantec Uninstaller, there’s another way to get rid of the antivirus. Simply navigate to the vendor’s website and download the RemoveSymantecMacFiles tool, which can be used for safely deleting all software developed by Norton. When the downloading is successfully completed, you have to do the following:

  1. Open the Finder by clicking on its icon in the Dock;
  2. From the menu bar, select Go and proceed to the Downloads folder;
  1. If the file has been downloaded with Safari browser, open the folder named RemoveSymantecMacFiles; if you’ve used Chrome or Firefox, locate the RemoveSymantedMacFiles file with the zip extension and extract the folder.
  2. Once in the folder, right-click on the file named control and select the Open with Terminal option

(Note that to run the Terminal, you should have administrative privileges);

  1. To remove all Norton antivirus files, type 1;
  2. Press the Return button;
  3. After the tool has finished removing all files and folders associated with the app, type y in the Terminal

(Note that all work in other applications has to be saved because the command restarts the Mac);

  1. Press the Return

Despite the fact that the described-above approaches to removing the utility have been proposed by the vendor, it is recommended to check for leftovers of the antivirus that might be scattered all over your drive. The following section of the article details a method of removing all traces of Nortel antivirus from a Mac.

How to Completely Remove Norton from Mac

how to remove norton
 

To completely eradicate all leftovers of the antivirus from the Mac, it is necessary to use the Terminal. This method requires a bit of technical skill; therefore, its use is recommended for experienced Mac owners who are not afraid of the Mac OS X command line. To find Norton’s traces, launch the Terminal and use the mdfind –name “Norton” command. This broad search will show binaries, .plist files, caches, and other components of the antivirus that should be removed. The following file paths will lead you to locations in which the app components reside:

  • ~/Library/Application Support;
  • ~/Library/Caches;
  • ~/Library/Container;
  • ~/Library/Preferences.

It is important to reiterate that if you are not 100% sure that you know what files you are deleting, it is necessary to back up your Mac, to prevent the accidental removal of system files. Additionally, this method of Norton uninstalling necessitates administrative privileges, which is why you will be asked to enter the administrator’s name and password.

Removal of Norton Antivirus: The Alternative Route

The alternative approach to removing Norton from the Mac is to utilize third-party cleaning apps that are freely available on the Web. The upside of this approach lies in the fact that it is much quicker than the manual removal of application leftovers, which can be quite tedious. Furthermore, it is more secure since the user won’t delete system files by mistake. Thus, to sweep a hard drive of your Mac from unnecessary Norton-related files, thereby freeing up additional storage space, download a cleaning utility. Install it on your Mac and follow instructions created by a vendor to delete the antivirus and all of its files and folders.

Close Menu